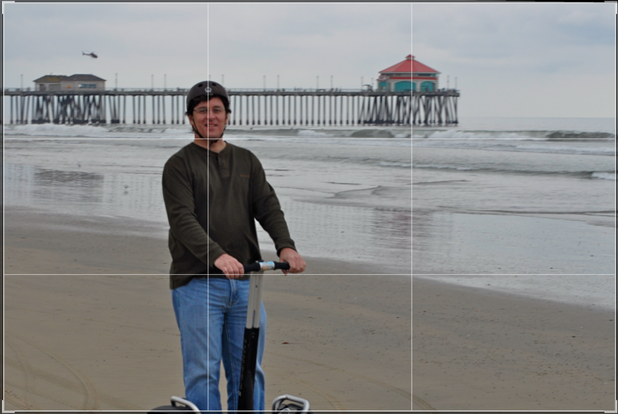
Even the best photographers need to crop their photos sometimes. The photos the rest of us take can almost always be improved by a little cropping, and maybe a bit of straightening. Sometimes cropping is just for effect, other times you need to get your photo into a certain proportion, possibly for a postcard, a particular frame size, or maybe to perfectly fit your computer display or iPhone. In this video I show how to use iPhoto to straighten, crop, and even add some edge effects if you like.
It’s probably no coincidence that iPhoto’s “Straighten” button is immediately above the “Crop” button on the “Quick Fix” tab of the Edit pane. If you want to straighten your photo, definitely do it before cropping. If you don’t, then the act of straightening it may cause important parts of your photo to rotate out of the cropped area.
Cropping a photo simply involves defining a rectangle around the portion of a photo that you want to keep. In practice it sometimes involves switching back and forth a few times between sizing the rectangle and moving it into the best position. Moving the crop rectangle is performed by clicking and dragging anywhere inside the rectangle. Sizing the rectangle is a bit more complex.
The “Crop” function gives you three basic ways of sizing your crop rectangle:
- Constrain to preset proportions
- Constrain to custom proportions
- Uncontrained
Click on the dimensions to the right of the word “Constrain” and iPhoto will offer you a dozen or so preset sizes. Remember that these are proportions, not absolute sizes. That’s why “Square” has no numbers. It’s just square! When you choose any of these, you can then click and drag the rectangle corners to change the crop size while retaining the chosen proportion.
If none of the preset options suit your needs, choose the “Custom…” option and enter whatever proportion you need.
In either of these cases, you can choose the “Constrain as landscape” or “Constrain as portrait” options to switch between those layouts. For instance, for a tall postcard shape you would first choose “4 x 6” and then “Constrain as portrait”, turning it into a 6×4. The landscape/portrait options are disabled on the Display, DVD, and HD sizes since their layouts are always landscape.
The first time you click the “Crop” button for a photo, you can simply click and drag any of the corners of the crop rectangle to size it. If you’ve already chosen a preset or custom size and then change your mind, just uncheck the “Constrain” checkbox and you can crop your photo to any rectangle you desire.
You’ll notice when you are sizing or moving your crop rectangle that iPhoto divides the rectangle into nine equal sections. The purpose of this is so you can try to place the points of interest in your photo at the intersections or along the lines. Darren Rowse’s Digital Photography School has a good article on this Rule of Thirds. Be sure to also read his article on when to break the Rule of Thirds.
In the video above I actually did a terrible job of cropping, placing myself boringly at the center of the photo. Following the Rule of Thirds, a more interesting effect is achieved by placing me along the left vertical line, the red roof on the right vertical line, and the breaking surf on the top horizontal line, like this:

Better cropping using of "Rule of Thirds"
Once you’ve straightened and cropped your photo, you may want to check out the edge effects that iPhoto offers. In the “Effects” tab, you’ll see “Matte”, “Vignette”, and “Edge Blur”. All of these can be adjusted to a range of effect sizes and can be used singly or together.
Finally, if you need to export a photo in a particular size (not just proportion), then you need to use the method described in “How to export photos from iPhoto”.